Tuesday, July 23, 2013

How to Replace the Lift Cable on Your Skamper Popup Camper, Goshen Lift System

Hi All,

I am finally getting around to writing this post about how to replace your popup camper lift cable on a 1989 Skamper 240C that uses the Goshen Lift System to apply force to all four corner posts equally. Here is a list of tools and parts that I needed:

  • (1) Goshen Lift system aircraft cable (comes with correct length crimps and push plates). SPEND THE $30 ON IT AND SAVE YOURSELF A LOT OF TIME!)
  • Carbide Drill Bits, 1/8" to 3/16"
  • Standard Ratchets and wrenches.
  • (4) New #10-32 x 5/8" long, high strength bolts. I used Black Oxide Socket Head Cap Screws (SHCS) and nuts.
  • #10-32 tap
  • Extra length of cable, smaller diameter preferably.

Please save yourself some time and frustration and order the lift cable directly from Goshen Metal Stamping, http://www.goshenstamping.com/lift.php.  This was the best $33 I have spent in a long time. First of all it was nice to actually talk to someone, place a COD order with them, and have it show up exactly when it was supposed to. It was a throw back experience to the old days of commerce. I have read other posts about people crimping there own cables but I think I saved myself a ton of time by just ordering the correct part from Goshen. First things first, DO NOT pull your old broken cable out of the camper you will use this to "fish tape" your new cable in!

STEP 1).  I started by jacking up my trailer so I could get under it. I also used the appropriate jack stands under it so I could work safely. Remove the rear push spring brackets at both rear corners of your popup. This proved very hard for me since the old bolts used the a bowtie bit to break them loose. I was only able to get one off and the other three rounded off. This was problematic because the screws were harden and my high speed steel (HSS) drill bits just couldn’t drill out the screws. That's where the carbide drills came into play. The carbide drill cut through them like butter but I kept breaking them since they are brittle but I had a few extras. Here are some pictures:

Skamper Corner Lift Bracket
STEP 2). Remove the (4) bolts that connect the other ends of the rear lift tubes at the master tube. You will then be able to lower the lift tubes and springs from the corner lift tubes and then pull the lift springs out of the master tube.

Skamper Popup with Rear Lift Tubes/Springs Removed

Skamper Rear Lift Springs

STEP 3). Use your old cable, still in your camper, to fish the new one into it. I did this by using a extra length of smaller diameter cable from a broken come-along that I had saved. The cable will only go in and out of the master tube from one direction because of the two crimped stops and the push plates. First take your extra cable and electrical tape it as tight as you can to the end of the broken cable at the front (that is where mine broke). This may take a few tries but pull it through the master tube until you have the taped end at the rear of the camper. Un-tape the old cable and discard, then retape the new cable end to the extra piece of cable now in your master tube. Once that is taped tight pull the new lift cable through the master tube. It will stop at the front lift springs and won't go any more. Now fish the other end of the new cable up through the rear pulley and into the master tube. You will need to keep your rear lift springs/tubes on their correct side and you will also need to run the cable between the springs. Before I reinserted the lift springs I cleaned the old grease off of them with a few old rags. You need to make sure the lift springs are pushing the pusher plate into the top part of the master tube.

New Lift Cable Taped to Extra Fish Cable, Ready to Pull new Cable Through to Crank
STEP 4). Once the rear springs and tubes are inserted back into the rear of the master tube, you will need to re-attach the (4) heavy duty sheet metal bolts. Next you will need to reattach each corner lift bracket. Before I did that I had to make sure the holes were ready. I did this by chased the threaded holes with a #10-32 tap. Once installed I added a #10-32 nut to the back of each screw so I new they would not rattle lose. I also used lock washers in addition to the nuts.

I did this by myself and it took me about 4-5 hours. It helps to have some extra hands but it gave me the time to analyse my moves and not break anything. I should have taken more pictures but its hard when your hands are all greasy and you are tired. I hope this helps.

New Lift Cable Installed.


Here is a link to the PDF of the Goshen Lift System for my camper.

http://www.goshenstamping.com/pdf/1473_SERIES_DIAGRAM-PARTS_LIST.pdf


Sunday, June 30, 2013

Broken Lift Cable on our Skamper Pop Up Camper

Hi All,

We were just getting ready to get the camper ready for the summer when while cranking it up we heard a loud "SNAP"! Our 24 year old lift cable on our 1989 Skamper 240C pop up camper finally broke.

Broken Lift Cable Skamper Pop Up

Broken Pop Up Camper Lift Cable near Crank

Luckily it broke near the crank and is easy to get at. I thought about rigging it somehow but it is worth it to fix it right since the cable is original. I did the research on our lift system and we have the Goshen Lift system which is still being made by the Goshen Stamping Company http://www.goshenstamping.com/lift.php. They still make and sell parts for their lift system that they have been building since 1976. The lift cable is about $15 - $25 in parts but it is going to take about 2 - 5 hours of labor since I have never done one before. I will definitely be posting pictures here of what I had to do to fix it. Here is an up to date shot of our Skamper.

Up to Date Skamper Pop Up Picture

Sunday, June 16, 2013

Stayed at the Best Condo in Indian Shores on Florida's Gulf Coast

Hi All,

I recently posted about a trip we took to Indian Shores, Florida on the Gulf Coast. We stayed at a wonderful condo that we rented directly through the owner using the website https://www.airbnb.com. We had an awesome time and the condo was great! It was a three bedroom, two bath condo, with covered parking and direct access to the ocean. I didn't wear shoes for four days while we were there unless we went out to eat or site-see. We stayed there with six people for less than $150 a night. I am definitely going back to the same condo which made me hesitate about posting this article but I couldn't keep this to myself I had to share. Here are some pictures of where we stayed and here is the direct link to more info about renting this condo. This link has tons of great pictures of the inside of the condo.

https://www.airbnb.com/rooms/666335


Indian Shores, Florida Condo

Indian Shores, Florida Sunset

Gulf Cost of Florida Sunset


Since there were six of us (two families) renting the condo for four days, this was a lot more affordable than staying at a hotel. The kitchen was great because we didn't have to eat every meal out. Having the ability to do laundry was awesome since we had kids and they made extra messes with their clothes. Every day we would down the stairs barefoot and then 40 feet to the warm sand of the Gulf Coast of Florida. Here is a direct link to where you can rent the same condo, enjoy!

https://www.airbnb.com/rooms/666335

Friday, June 7, 2013

Indian Shores, Florida on a Budget


We just finished visiting Indian Shores, Florida. What an awesome Gulf Coast island town. We stayed at an great condo right on the beach, I'll have more info on that later. Check out the pictures of the Gulf of Mexico as tropical storm Andrea just passed us by.


Saturday, November 24, 2012

Sandia Man Cave in the Jemez Mountains

The Sandia Man Cave is cave in the Jemez Mountains near Placitas that was found in the 1930's. It was excavated and the remnants of the cave were removed to the University of New Mexico. There is now a hiking trail, a fence, and a small spiral staircase that leads up into the cave. It is an easy hike from the parking area but not so easy if you are afraid of heights. In my picture you can barely see the spiral staircase and cave entrance in the upper right corner of the picture.

View from the Sandia Man Cave Trail

Baseball in New Mexico

I wanted to share a quick picture of our baseball team, the Albuquerque Isotopes, in action this past summer. We do not have a lot of major sports out here but we have some. Enjoy the pictures.

Albuquerque Isotopes - View from Outfield

Isotopes from the outfield

Isotopes Baseball at Sunset

Sunday, July 22, 2012

Santa Fe National Forest - Black Canyon Campground

Just got back from a quick weekend trip to the Santa Fe National forest and it was beautiful! We chose this particular campground because they took online reservations which were easy to book. Here is the link to the reservation site, http://www.recreation.gov/camping/Black_Canyon/r/campsiteSearch.do?site=all&type=9&minimal=no&search=site&criteria=new&contractCode=NRSO&parkId=70078&topTabIndex=Search. They do charge $9.00 extra for a total of $19.00 a day but it is worth it! Check out the pictures of how beautiful it is!

Black Canyon Campground in our Skamper

Very nice campground and quiet too.

Saturday, July 21, 2012

Great, Affordable Idea for New Popup Foam Cushion Covers

So like most owners of older popups, we were faced with dealing with the old icky foam and cushion covers. We first thought about replacing the foam until we priced it out and realized one large piece would cost around $200. We then moved on to plan "B" which was to wash and "defunk" our old foam cushions. We were able to do this with a lot of Febreze and the hot dry desert sun. After spraying the foam with Febreze we left them out in the direct sunlight and allow the sun to heat them up and get rid of any offending odors. This worked very well for us but we also have lots of hot dry air down here. Next up were the cushion covers, they were washed multiple times. This was okay but the really bad stains and old burn marks were hard on the eyes so last year we just covered them with sheets. This year however my wife had a brilliant idea on how to cheaply recover your cushions. We used some older duvet covers that worked like a charm especially on the couch cover. One twin duvet cover allowed us to fit both couch cushions in it at the same time with enough material so it could hinge together to form the couch. Check out the pictures. We will definitely upgrade to a non Winnie the Pooh theme but that is what we had to try it out.

Twin duvet cover used as couch cushion cover in our popup

Bear Creek Canvas Update - One Year Later

It was finally time to dust off the old Skamper popup and open her up to see how she fared over the winter. Everything looked great including our Bear Creek canvas. We found some sand that found its way into some of the cracks and crevices that must still be open a little but nothing we couldn't handle with a broom. There were no signs of little critters which I am very grateful for, but I should probably thank our dogs for that because they are excellent mousers and critter hunters. We did take our popup out for one quick weekend so far and here is a picture of how she looks after sitting for almost a year.

First trip of 2012 in our rebuilt Popup

Monday, January 2, 2012

Kasha-Katuwe Tent Rocks National Monument, New Mexico

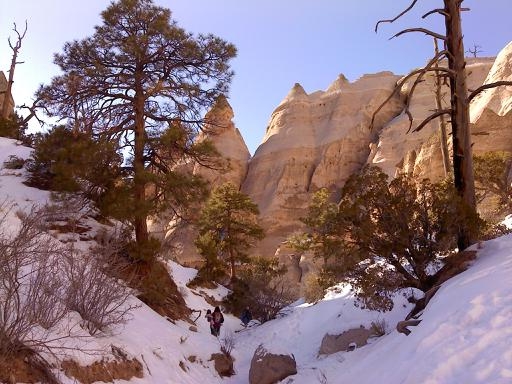
We finally decided to take a winter day trip that was well worth the drive. We went to Kasha-Katuwe Tent Rocks National Monument near the Cochiti Pueblo in New Mexico. It was a great 45 degree and sunny day to go for a hike in the foothills of the Jemez Mountains. The weather was great and there was still some snow on the ground but later on in the hike we found out that there was still some deep snow that prevented us from reaching the end of the canyon trail. Here are some great pictures form our most recent winter day trip.

Rock Formations at Tent Rocks

Snow in the Canyon at Tent Rocks National Park

Rock Formations and Snow at Tent Rocks

Tuesday, December 6, 2011

New Mexico Winter Sunset

Here is a great picture a day after some heavy snowfall. This picture is of the Sandia Mountains at sunset and shows both the snow and the pink mountain sunset we are always accustomed to seeing.

Sandia Mountains Winter Sunset
A very peaceful site to come home to after a long day at work.


Lots of Snow Today in New Mexico

I took that picture of the upcoming weather in the mountains a couple of days ago only to wake up to this a few days later.

Snow Covered Subaru in New Mexico

Lots of people think that New Mexico is a dry and barren wasteland but as you can see it has a lot more to offer.

Sunday, December 4, 2011

Beautiful December Morning near the Sandia Mountains

I woke up to a different site this morning of the Sandia Mountains. I am usually greeted in the morning with a big bright view of the Sandias but this morning shows that we do experience the seasons here in Northern New Mexico. Notice the low lying cloud cover or fog in the valley.

Winter in New Mexico


Tuesday, August 9, 2011

Yellowstone National Park in our Skamper Pop Up, 2000 mile Trip

Most people would like to take a test trip in their newly renovated pop up camper, somewhere close so that if anything goes wrong then you can get it fixed quickly and cheaply. We ran out of time on our renovation so we loaded up our Skamper and then drove 1,000+ miles to Yellowstone National Park for a nine day trip! We had a wonderful trip with only a few problems that surfaced from our camper.

  • 22 year old roof vent leaked a little - We had planned to replace this but we ran out of time. Fortunately the leak was minimal and was mitigated with a pot.
  • A crappy weld from the previous owner on the back bumper broke - The upper part of the weld broke which was fixed with some Walmart small corner brackets and self drilling screws. I have a new found love of self drilling screws. 
Everything else went great! Our new canvas performed wonderfully during its first rain and also during the 35 degree nights in Wyoming. We did make sure that we purchased new tires for our trip and also replaced the seals, bearings, and grease on the trailer axles. I also knocked out the old bearing races and pressed in the new bearing races as well. This was key for a worry-free pulling camper. At every gas up I got out to check the tire and hub temperatures with the back of my hand and they were barely warm even in the 100 degree heat. Check out the cool picture of our Skamper in Yellowstone!


Our Skamper Pop Up in Yellowstone
Skamper in Yellowstone

Friday, July 8, 2011

New Pop Up Camper Canvas from Bear Creek has Arrived

When we bought our project pop up camper we knew that we were going to have to replace the canvas. From far away the exterior of our old canvas did not look too bad but once you got close you could see how old our canvas was. First off there were quite a few patches on the wing sections of the canvas. We also noticed some water damage on the inside corners as well which told us they were leaking. The interior portion of the canvas is what made us decide to replace it. None of the windows were working. All the zippers were either sewn or silicon sealed shut. The corners were also sewn together where the Velcro started to fail. The canvas was old, stiff and smelled funny from probably from being 22 years old.

We checked the internet for replacement canvases and all good reviews pointed to Bear Creek Canvas of Spencer, Wisconsin. We spoke to the folks from Bear Creek weeks before our purchase. We had lots of questions and they did not hesitate to answer any of them via phone or email. Bear Creek did not have a pattern for our camper but that didn't stop them. We shipped our old canvas off to them and in less than the 10 week quoted delivery time we had our new canvas back.

I was very excited to receive our new canvas and get it unpacked. The same day we got it, I already had it hanging in our camper and it fit great. I need to stop and say the money we spent on getting a new canvas was well worth it and I wouldn't hesitate to do it again on any future pop up projects. Here are some of the features to upgrading your canvas:
  • The new canvas was lighter in weight but just as strong.
  • The wings are covered in vinyl instead of coated canvas.
  • The canvas is pretreated and requires no additional waterproofing.
  • The corner seams were changed from Velcro to heavy duty zippers.
  • The wing side tie downs are bungee cords instead of string.
  • It came with new metal snaps and an installation tool.
  • Windows are triple pane (canvas cover, tinted plastic, and screen) with straps for keeping them in place when unzipped.
Needless to say I am very happy with my new canvas and am looking forward getting out there and camping. Here are some great before and after pictures. Our pop up still needs a little work but we are going to enjoy it some this season and look to finish it in the fall. Luckily our fall season lasts until November in the desert Southwest. Check out these pictures.

Old Skamper Pop Up Canvas-1

Old Skamper Pop Up Canvas-2

Old Skamper Interior-1
As you can see the exterior did not look to bad except for the multiple screen repairs and cuts. That brown stuff on the windows is the spray adhesive that was used to seal extra plastic to the windows. Here are the new canvas pictures.

New Skamper Canvas from Bear Creek-1

New Skamper Canvas from Bear Creek-2

New Skamper Interior

Monday, July 4, 2011

New Pictures of Skamper Pop Up Camper Restoration

It's been a little while since we last posted but we have been busy with the rebuild. The cabinet resurfacing is complete. All that is left to do for the cabinets is to cut out a few openings and install cabinet doors. I really like the dark stain with the light floors and walls. It took three sheets of stain grade beaded plywood to rebuild the cabinet faces. Some of the cabinets have a new face over the old face. Pieces that needed to be totally replaced were created by screwing two pieces of 3/8" thick beaded plywood back to back to create a 3/4" piece with the texture on both sides.

Old Cabinets & Floor

New Cabinets, Floor, & Paint
 We also were contacted by Bear Creek Canvas of Spencer, Wisconsin and notified that our canvas is ready and is now being delivered almost a week ahead of schedule. We are very excited to receive our new canvas and get it on our Skamper. Stay tuned for pictures of the new canvas.

Saturday, June 11, 2011

How to Renovate your Pop Up Trailer Cabinets

So we are continuing along with our 1989 Skamper 240C Pop Up camper restoration. The heat of summer is now on us and it makes going out to work on the camper a little harder. This weekend we decided to tackle how we were going to upgrade (renovate) the cabinets. As most people know the cabinets in pop up campers are not very substantial. They are made from a 3/4" x 1" skeleton wood frame with a thin veneer stapled over the frame. I believe this was done by the camper companies for two reasons. First was to save money and second was to save on weight. You could easily add 500 pounds to your camper by install heavy wood cabinets in place of the thin style that are in there. The thin veneer is 3/16" thick plywood with an almost paper like wood grain veneer covering it. After 22 years the veneer has started to wear off and almost start peeling in places. This made painting the existing cabinets out of the questions. We are doing a bootstrap renovation but we don't want it to look bad. Here is a picture of one of the cabinets that I started with.

Skamper Cabinet
So we took a walk through the wood department of Lowes and Home Depot and found stain grade bead board plywood. We also had to replace the cabinet doors which were of the same construction. For the doors we took a trip to our local Habitat for Humanity ReStore. The ReStore is a great resource for good priced building materials and other odds and end that end up getting donated to them that they resell for their charity. We knew that they had two aisles of cabinets doors for $5 - $15 each. We ended up buying five of the $5 doors for our camper that happened to have the vertical bead board pattern as well. Our idea was to "re-skin" the existing cabinets with the bead board. The new bead board is 3/8" thick so we will lose some interior space but not much. Here are some pictures of the same cabinet as above with its new bead board skin and a close up up the sandwiched assembly.


The addition of the 3/8" bead board will increase the weight of our trailer some but I estimate maybe only 50 pounds. It is well worth it because now the cabinets are extra sturdy and will last another 20 years. Here is a picture with the old pinkish colored counter top and the door with the stain that we will have to match. Counter tops will have to be changed after the summer camping season.

New Skamper Cabinet

Friday, May 27, 2011

New Floor in our Skamper Camper

The new floor is almost done! So far it is looking really good. We scraped the crap off of the floor and cleaned it very well. We swept and then vacuumed the floor as well to make sure it was clear enough. Next we found the center of the floor in both directions and then offset the marks 6" to one direction so we could align the tile edges to our floor lines. So far so good. I got most of the easy tiles set and will finish the cut tiles tomorrow.


Peel & Stick Tile Deal at Lowe's

We got a super sweet deal on peel and stick tile for our pop up camper. It was on sale for .25 cents a tile. We purchased two boxes (45 tiles per box) for a total of $22.00. This saved us $12.00 on the cost of flooring. We chose peel and stick tile for our floors because of the cost and ease of use for installation. Those peel and stick tile went on sale this past Thursday and they were only marked in the paper and not in the store, so there were plenty of boxes on hand.

Lowe's Peel and Stick Tile

Picture of Lowe's Tile Part Number

Painting our Skamper Pop Up Camper

We have been waiting for the weather to cooperate and we finally got some time. Spring time is a very windy time of year in the desert Southwest and so far this spring is super windy. We wanted to update the interior color of our pop up so we went with some different colors besides the typical wood grain finish. We have seen other people do this with their campers as well, so we decided to give it a shot. Take a look at our pictures of both the ceiling and the walls. The ceiling's contact paper was peeling off so we peeled it off all the way and painted the hardboard that was left exposed. It took three coats of paint but it finally looks nice.

New Wall Color in our Pop Up

Painted Ceiling in our Pop Up